Subscribe to SSL.com’s newsletter, stay informed and secure.
Copy article linkThe following instructions assume that you wish to run both a secure server (on port 443 ) and a regular server (on port 80 ). First, you need to configure the server to listen on both ports. Either edit /etc/apache2/ports.conf (in Debian; this is included in apache2.conf ) or edit /etc/apache2/apache2.conf directly to include the lines:
Listen 80 Listen 443
Next, edit /etc/apache2/sites-enabled/yoursite to use the SSL settings. Separating the regular and secure server settings out by using VirtualHosts is the easiest option in terms of maintainability. Any configuration outside the VirtualHosts sections (such as setting the ServerAdmin) will apply to both (and any other) VirtualHosts.
Note: Beginning with Apache 2.4.8, the practice of keeping the server certificate and intermediate certificate chain in separate files has been deprecated. Both the current and legacy methods are detailed in the clickable tabs below.
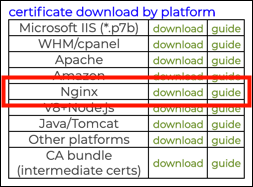
Apache 2.4.8 or greater Apache 2.4.7 or belowVersions of Apache 2.4.8 and above expect your server certificate to be concatenated with any intermediate certificates in one file. To download a chained file from SSL.com, choose the Nginx download link in your portal account:

Alternately, you can can concatenate your existing certificate and intermediate files with a command like the following:
$ cat /etc/ssl/private/ca-bundle-client.crt >> /etc/ssl/private/yourdomain.crt
Add the following section to your config file:
# ================================================= # SSL/TLS settings # ================================================= NameVirtualHost *:443 DocumentRoot "/var/www/yoursite" SSLEngine on SSLCertificateFile /etc/ssl/private/yourdomain.chained.crt SSLCertificateKeyFile /etc/ssl/private/myserver.key
A few notes on this configuration:
Add the following section to your config file:
# ================================================= # SSL/TLS settings # ================================================= NameVirtualHost *:443 DocumentRoot "/var/www/yoursite" SSLEngine on SSLCertificateFile /etc/ssl/private/yourdomain.crt SSLCertificateKeyFile /etc/ssl/private/myserver.key SSLCertificateChainFile /etc/ssl/private/ca-bundle-client.crt
A few notes on this configuration:
To run the regular server on port 80, add the following section to the config file:
NameVirtualHost *:80 DocumentRoot "/var/www/yoursite" # Host-specific directory setup, options, etc # Most of these options are likely to be set outside the VirtualHosts # sections.
After you’ve saved the edited configuration file, restart the web server. If you did use a passphrase when generating your certificate, you’ll need to enter it when challenged.
Create a basic index.html page wherever the root directory for your web server is located, if you don’t already have content there.
Then point your web browser at https://www.yoursite.com . You should see an SSL connection opened and the page delivered. If you’re using a self-signed certificate, your browser will pop up an alert warning you that the server’s identity cannot be verified. You can choose to view and accept the certificate. If using an external certificate, it should all happen without intervention.
Make sure as well that you can’t access the protected content using http://. If you try, you should get an error message.
If it’s not working as expected, first check that your server is actually running, using ps -a | grep apache . If that doesn’t return anything, try restarting it, and check for error messages on the terminal.
Also check that the permissions on your key and certificate files are set correctly (see above), as well as the permissions on your test HTML file and its parent directory.
Next, check the logs. You should check both the main server logs and also the SSL logs that you set up in your config file above. If you don’t get anything useful, try changing the LogLevel value in the Apache2 config file to “debug”, restart Apache2, and test again. This should give more logfile data.
If you are running a regular web server on port 80 as well, try fetching a test page via http:// rather than https:// to help identify whether the problem is with the web server or with the SSL connection. Note that in the setup above, the web server’s root directory is different for http:// and https://, so you won’t (or shouldn’t!) be able to access the same content. If your test page in the http:// root directory works fine, though, and your test page in the https:// root directory doesn’t, then that can help you to pinpoint the problem.
If the problem is the SSL connection, a useful tool is s_client , which is a diagnostic tool for troubleshooting TLS/SSL connections. The basic usage is: /usr/bin/openssl s_client -connect localhost:443 . There are numerous other options as well, for which you can check the documentation. If you get error messages, this should help you in locating the problem.
Thank you for choosing SSL.com! If you have any questions, please contact us by email at Support@SSL.com, call 1-877-SSL-SECURE, or just click the chat link at the bottom right of this page.